
One of our favourite plugins when it comes to migrating your WordPress website from one host to another is All in One WP Migration! Simply put – it’s awesome! It takes care of all the typical digging around in databases, wp-config files etc etc that comes with migrating your WordPress website.
We have already written a blog post on how to use All in One WP Migration to migrate your site – check it out here. Sometimes though the ‘standard’ steps don’t quite work and you will find yourself wondering WTF!!??
Don’t worry though, if that is you and you have run into an issue when trying to migrate don’t uninstall this plugin just yet! Let me run you through some of the issues that typically pop-up and how to solve them (that’s why you are here obviously – who wants to know about a problem without a solution after all!)
Issue 1: Your backup size is greater than 512mb
So you have two options here – one will cost you money and the other one will take a bit of extra effort on your part.
Option 1: This is our recommended option and will save you lots of blood, sweat and tears if you migrate alot (either one site or multiple). Purchase the Premium Unlimited Extension for All in One WP Migration. It will cost you $49 but allows lifetime updates and use on an unlimited number of sites. Once purchased you install and activate the plugin on both the ‘old’ and ‘new’ site and follow the steps you would normally follow (check out our post on what those steps are for a reminder just in case).
Option 2: If you are stingy or you just like extra work you can always reduce the size of your backup by excluding your media files from the backup and restoring these manually via FTP once you have restored your site.
Step 1: Login to your ‘old’ site via FTP (you might need to ask your current host for your FTP login details and you will need to make use of an FTP client – our preferred client is FileZilla but there are lots of other options as well).
Step 2: Navigate to your ‘uploads’ folder in your WordPress installation directory (by default it is found in your wp-content folder.
Step 3: Use your FTP client to download this folder and then create a .zip archive using WinZip
Step 4: Perform all the steps from our post on How to migrate your WordPress Website with All in One WP Migration except at step 5 make sure that you click ‘Advance Options’ and exclude ‘Media Files’ (see screenshot below)

We typically don’t export spam comments (I mean why would we need that) and post revisions as a standard with the media files only being excluded as a last resort (this starts becoming a necessity when your backup file size is larger than 2GB’s). Leave the rest as ‘Ai-is’.
Step 5: So you have completed the steps and have your site restored but now all your images are returning with a 404 Error. Don’t worry, this is where that .zip of your uploads folder comes in handy! Because All in One WP Migration restores everything exactly as it was on your old site (links, database, posts, pages etc) all you need to do is (via FTP again) upload and extract the .zip folder in your wp-content folder of your new site.
Step 6: Refresh your permalinks and clear your cache (CTRL + SHIFT + R if you use Chrome) and clear your cache if you use any caching plugins and that should be it.
Technical Advisory: For this to work the folder structure of your entire WordPress installation needs to be EXCATLY the same on the ‘new’ site as on the ‘old’. Practically this means if you installed WordPress in a ‘WordPress’ folder (i.e. public_html/wordpress/) that when you install WordPress on your ‘new’ host you need to ensure that this folder structure is the same!
As well if you had media files that were saved outside of the uploads folder it would be best to create .zip’s of these folders as well.
Issue 2: When you create your export or are busy importing it ‘freezes’ during the process
So most hosts set limits with regards to the time scripts can execute for, the size of the file you are able to upload or download etc etc. This is obviously in a bid to avoid abuse of resources but becomes a pain when trying to export or import your site as your connection times out and things seem ‘broken’.
So how do you know if you are having issues where your connection timed out??? The easiest way is to use Google Chrome when trying to export or import your site. If you suspect there is an issue then all you need to do is press F12 – this will bring up a potentially daunting screen (if you are not technically inclined) but basically if you see any red on the ‘Console’ tab you have errors! The typical errors you would see would be ‘ERR CONNECTION TIMED OUT’ or ‘ERR ENTITY TOO LARGE’.
When exporting…
So if you experience issues when exporting the quickest ‘fix’ is to check whether the export has stopped completely (in most instances it just times out in the browser but continues to run in the background).
To check this find the new option for “All in One WP Migration” and select “Backups”.
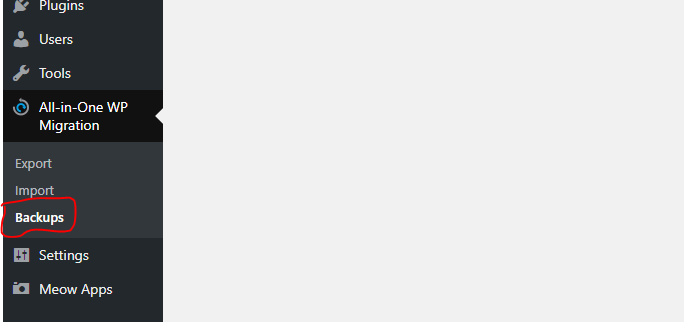
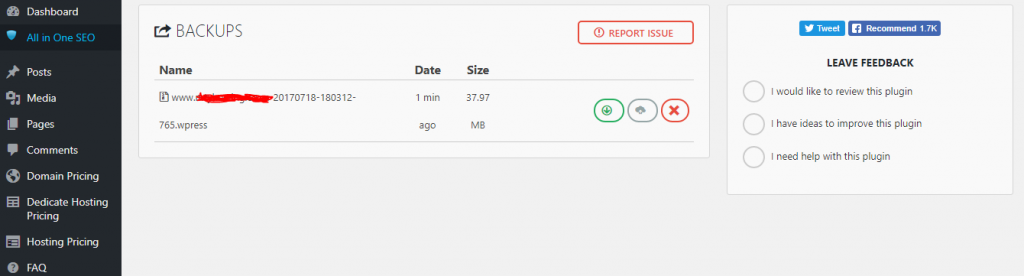
You will see all the backups you have created. Find the one you have just attempted and if the size of the backup is increasing then it is still running and you just have to be patient.
Otherwise you it’s best to contact your host for assistance. If they are unable to assist you are more than welcome to contact us and we can assist you in troubleshooting what the issue is and resolving it for you!
When importing…
So the most common issue when importing is that your host has set a limit on the file size you are able to upload via the browser. There is a very easy way to get around this though.
Step 1: Make sure you have the backup file from your old site (the one ending in .wpress).
Step 2: Login to your new site via FTP (using FileZilla or any other FTP client).
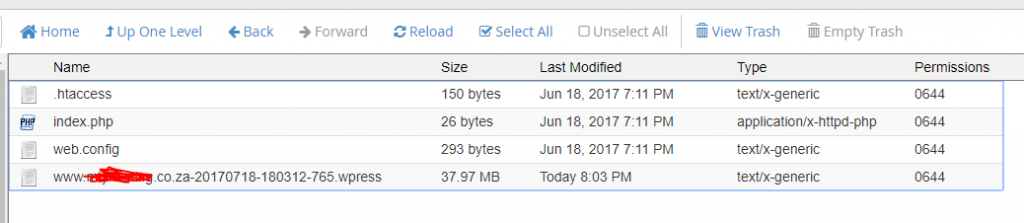
Step 3: Navigate to the ‘ai1wm-backups’ folder which can be found in the ‘wp-content’ folder.
Step 4: Upload your backup file into this folder.
Step 5: Return to your WordPress dashboard and find the new option for “All in One WP Migration” and select “Backups”.
Step 6: You will see your recently uploaded backup there and all you need to do is click ‘Restore’ (the cloud looking icon).
Step 7: The restore will take place as normal (re-save permalinks etc etc) and that’s it you are done.
Issue 3: You don’t have enough space to complete your backup
So this is not really a major issue – all you need to do is upgrade your hosting package to allow enough space for the backup to complete. You can check how much space you might need by logging into your cPanel and checking your disk usage.
A point is if you have been making a number of backups then remove these as each time you create a backup it uses up space (even the failed attempts). Successfully completed backups can be found in the ‘ai1wm-backups’ folder in your ‘wp-content’ folder for WordPress. Any backups that failed prior to completing are stored in the All in One WP Migration plugin folder. To find where you would click ‘wp-content’ –> ‘plugins’ –> ‘all-in-one-wp-migration’ –> ‘storage’. Delete any large files that you find here to free up space.
So the above list is obviously not exhaustive so if there are any other issues that you have found when using All in One WP Migration please comment below. Overall this plugin is awesome though for a free plugin and has saved us hours and hours of time when need to migrate sites.
If all of this seems too daunting for you to complete or resolve (or you run into any further issues) then contact us at MTYsquared and we will gladly assist you in migrating your content to your new host (hopefully that is us at MTYhosting).
We are also just a click away – make use of our ‘Click to Chat’ functionality and we will gladly offer you advice on what to do should you have issues (especially if you happen to be an existing client with us)…
That’s it from me… #ToThePowerOf MTYsquared!
Comments are closed.